
JJavaScript is single-threaded, meaning it can only execute one task at a time. This is managed by Call Stack, where functions are executed in a synchronous manner (means one by one). The Event Loop is a fundamental part of JavaScript’s concurrency model, allowing it to execute code asynchronously. In this article, we’ll explore what the Event Loop is, how it works, and provide a code example to illustrate its functionality.
Understanding the Event Loop
The Event Loop is a mechanism that allows JavaScript to perform non-blocking operations by using an event-driven architecture. It continuously checks the call stack and the message queue, processing tasks as they come in.
Key Components
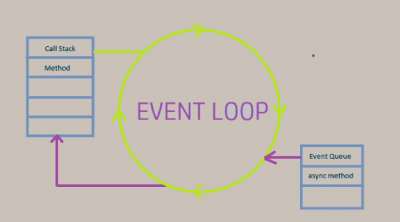
- Call Stack: This is where the JavaScript engine keeps track of function calls. When a function is invoked, it gets pushed onto the stack, and when it returns, it’s popped off.
- Message Queue: Also known as the task queue, this is where messages (or tasks) are queued up to be executed. These tasks can come from events like user interactions, timers, or network requests.
- Event Loop: The Event Loop continuously checks if the call stack is empty. If it is, it takes the first task from the message queue and pushes it onto the call stack for execution.
How the Event Loop Works
- Execution Context: When JavaScript code runs, it creates an execution context. Functions are executed in the order they are called, and the call stack keeps track of these executions.
- Asynchronous Operations: When an asynchronous operation (like a
setTimeout, a network request, etc.) is called, it does not block the execution of subsequent code. Instead, it registers a callback and continues executing the rest of the code. - Task Completion: Once the asynchronous operation is complete, its callback is placed in the message queue. The Event Loop will check the call stack and, if it’s empty, will move the callback from the message queue to the call stack for execution.
Code Example
Let’s illustrate the Event Loop with a simple example:
console.log("Start");

setTimeout(() => {
    console.log("Timeout 1");
}, 0);

setTimeout(() => {
    console.log("Timeout 2");
}, 100);

Promise.resolve().then(() => {
    console.log("Promise 1");
});

Promise.resolve().then(() => {
    console.log("Promise 2");
});

console.log("End");
Explanation of the Code
- Synchronous Code Execution:
- The first line logs “Start”.
- The second line sets a timeout for “Timeout 1” to execute after 0 milliseconds, which gets added to the message queue.
- The third line sets another timeout for “Timeout 2” to execute after 100 milliseconds, which also goes to the message queue.
- The fourth and fifth lines create two resolved promises that will log “Promise 1” and “Promise 2”, respectively. These promises will also be added to the message queue.
- Finally, “End” is logged.
- Order of Execution:
- The output will be:
Start End Promise 1 Promise 2 Timeout 1 Timeout 2 - Here’s why:
- “Start” and “End” are logged first because they are synchronous.
- The promises are executed next because they have a higher priority than
setTimeoutin the event loop. - Finally, “Timeout 1” is logged, followed by “Timeout 2”.
Conclusion
The Event Loop is a crucial part of JavaScript’s asynchronous nature, enabling it to handle multiple operations efficiently without blocking the execution of code. Understanding how the Event Loop works helps developers write better, more responsive applications by leveraging asynchronous programming techniques. By mastering the Event Loop, we can optimize our JavaScript code and improve overall performance.