
How to automate, build & deployment to your AWS ec2 instance?
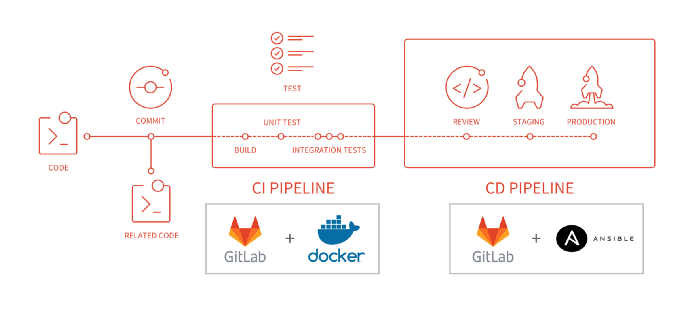
The goal of this tutorial is to give a high-level introduction of GitLab CI/CD that helps people get started in 30 minutes without having to read all of GitLab‘s documentation.
We will take an angular project as an example and guide you step by step to help you automate the process of the build and deployment of our application.To reach out our goal, we will be using :
- Gitlab
- Docker
- Ansible
- A host server (for example,Amazon Linux 2 AMI , kubernets, AWS cloud, etc … )
Ansible is an automating tool, with it you can automate anything
Infrastructure, Application-deployment, networks, Containers, Security-and-compliance and cloud.
For our case, we our going to use Ansible to automate the application-deployment
Why the choice of Gitlab ?
With Gitlab we can build a complete CI/CD pipeline solution with one tool. It’s fast, and it’s open source.
In the same place, we can create tickets, merge requests, write code and setup CI/CD tools without another application.
It is easy, simple to use and performs the best comparing to the other CI/CD tools, such as Jenkins, CircleCI and TeamCity

Scenario
In this article we gonna be following this scenario:
- Create our angular App and push it to Gitlab
- Configure our Gitalb CI/CD
- Implement build stage
- Implement packaging stage
- Implement deploy stage
- See the result
So, we have to get Git installed , node installed and a host server.
Create our Angular app
ng new angular-appNext we are going to make a new repository in Gitlab that we call “Devops”.
You should then see a screen like this. Follow the instructions in the push existing folder section so we can push our project to our Gitlab repository.
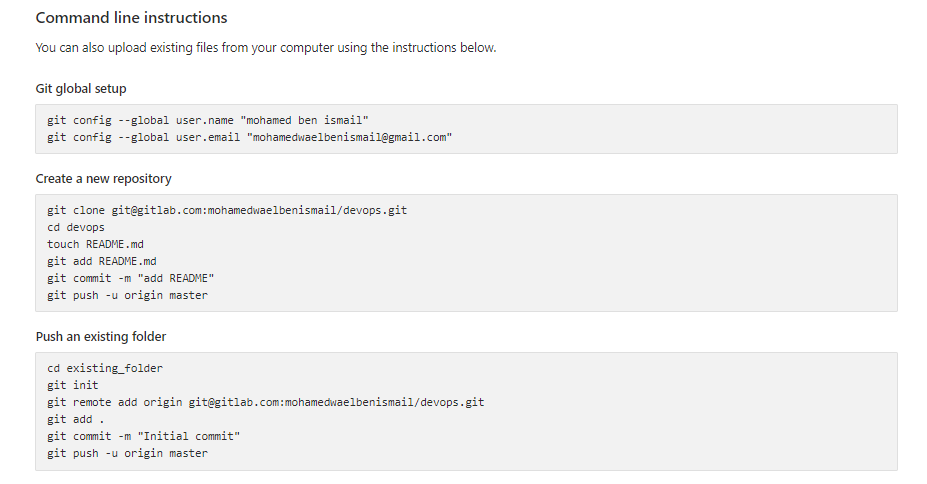
If everything set correctly, you should see a project in your Gitlab repository.
We are ready now to configure our Gitlab CI/CD.
Configure our Gitlab CI/CD
The first step here, is to install Gitlab Runner on our host server
Gitlab CI/CD uses Runners to execute pipelines, that means, without it, we can’t go further.
You can have your own runners directly on your machine or server.
This link will help you install Gitlab runner. Check at first theinstall Gitlab runner section then go to register Gitlab runner section.
these two sections will help you install Gitlab runner, then link it to your repository.
If the Gitlab runner is set, we can dive now, into the interesting part.
PS: When you register a runner, you must choose an executor.
An executor determines the environment each job runs in.
For example:
- If you want your CI/CD job to run PowerShell commands, you might install GitLab Runner on a Windows server and then register a runner that uses the shell executor.
- If you want your CI/CD job to run commands in a custom Docker container, you might install GitLab Runner on a Linux server and register a runner that uses the Docker executor.
To use GitLab CI/CD, let us create a file called .gitlab-ci.yml at the root of our project and add the following yaml for now :
stages:
 - build
 - package
 - deploy
This little yaml defines the stages of our Pipeline. A stage is basically a list of jobs (instructions) regrouped together. That means we are telling gitlab-ci to execute a specific list of jobs for each stage of the pipeline. Here is a detailed explication.
A.) Build stage
 i. Install NPM Dependencies

B.) package stage
 i. Run Dockerfile
 ii. push it in our container registry

C.) Deploy stage
 i. create ssh keys
 ii. Run Ansible script
Implement build stage
For the build stage we are going to add this part to our yaml file .
stages:
 - build
 - package
 - deploy

build:
  stage: build
  image: node:latest
  only:
    - master
  script:
    - npm install -g @angular/cli@9.1.0
    - npm install
    - ng build
  artifacts:
    paths:
      - dist/
    expire_in: 2 hours
  cache:
    paths:
      - node_modules/
Let’s explain the new part we have added.
build: it’s the name of our jobstage:build : means in the build stage we are going to execute this jobonly : the only tag, specifies the branches on which this job will be executed. For our case, we just specified the master branch, but you can specify more than one branch.image : we are going to use a node image, so we can execute our npm scriptsscript : the script part is designed to install the project dependencies and generate the dist folder, with the ng build command, which we are going to use later for the packaging part.artifacts & cache : Gitlab provides two ways of sharing files across jobs, which are artificats & cache.
- For the artifact part, we have specified that the dist folder generated by the
ng buildcommand, will be shared across the other jobs - The cache part, helps the
build-prod-appjob to retrieve thenode modulesfolder so it won’t do the build every time from scratch. This will help us gain some time.
Implement Packaging stage
First, for this part, we have to create at the root of our project a Dockerfile , with no extension, just a file called Dockerfile and let’s put in it this little code
FROM nginx:latest
COPY dist/angular-app/ /usr/share/nginx/html
COPY nginx.conf /etc/nginx/nginx.conf
let’s now dive into some explanations
STEP 1/3 : FROM Nginx:latest
In this step, we are telling our Dockerfile to use an nginx:latest image.
Nginx is a web server, it will help us display our application on the browser.
STEP 2/3 : COPY dist/angular-app/ /usr/share/nginx/html
Here we just copied the angular-app folder, which is located in the dist folder, generated previously by the ng build command into the html nginx's folder.
If we haven’t specified our dist folder in the artifacts previously, the package job won’t see it and we won’t be able to execute this step successfully.
STEP 3/3 : COPY nginx.conf /etc/nginx/nginx.conf
This step is prettier much the same as the previous one, we are copying the nginx.conf file into the /etc/nginx/nginx.conf .
For this step to be a success, we have to create the nginx.conf file at the root of our project and paste this code.
worker_processes  1;
events {
worker_connections  1024;
}
http {
server {
listen 80;
server_name  localhost;
root   /usr/share/nginx/html;
index  index.html;
include /etc/nginx/mime.types;
gzip on;
gzip_min_length 1000;
gzip_proxied expired no-cache no-store private auth;
gzip_types text/plain text/css application/json application/javascript application/x-javascript text/xml application/xml application/xml+rss text/javascript;
location / {
try_files $uri $uri/ /index.html;
}
}
}
In this file, we have configured Nginx to :
- listen on port 80
listen 80 - look for our application content in
usr/share/nginx/htmlfolder - look for all the rooters in our project (
location /)
Don´t worried, if you don’t understand some things in this file, it’s just a model to follow. You don’t need really to know everything about it.
We have finished now with the Dockerfile , we will now add some changements to our gitlab-ci file. Here is the update.
docker-build:
# Official docker image.
 image: docker:stable
 only :
  - master
 stage: package
 services:
  - docker:dind
 before_script:
  - echo $CI_BUILD_TOKEN | docker login -u "$CI_REGISTRY_USER"
    --password-stdin $CI_REGISTRY
 script:
  - IMAGE_NAME="$CI_REGISTRY_IMAGE:$CI_COMMIT_REF_NAME"
  - docker build --pull -t "$IMAGE_NAME" -f Dockerfile .
  - docker push "$IMAGE_NAME"
Let’s see what’s new here and explain it .
services : In this part, we are going to use a service which is docker:dind (dind: stand for docker in docker). This service will help us, build our Dockerfile created previously and pushed it to the container Registry
before_script : It’s clear from it’s name, we are going to execute some script before the script tag. The role of this before_script is to login to the container registry, so we can able,later, to push our built image to it.
Here is where you can find the container registry

Script: in this part we have done three things:
- First, we have declared a name for our image(you can put whatever you want)
- Second, we built our
Dockerfilewhich is located at the root directory of our project. The.at the end, means the root directory - Third, we pushed our image, in the container registry.
Implement the deploy stage
Now our goal is to:
- Add and configure Ansible into our project
- Install some dependencies to our host machine
- Configure our gitlab-ci, so we can be able to deploy our app
Add & configure Ansible
just go to this link and click on download all. After downloading the folder extract it and put it in the root directory of our project, and let’s dive into explaining the content of this folder .
So basically the Ansible folder, has this hierarchy

we have just to modify little stuff and we will be ready to go.
STEP 1: Config hosts.yml
Open hosts.yml and :
- Change the ”put-the-host-server-user” in the
ansible_usersection by the user of your host server, for me, it’s “ec2- user”.
(If you don’t know the user, type “whoami” in the terminal of your host server) - put in ”put-the-ip-of-your-host-server” in the
prodsection the IP of your production host server, and put the IP of your development host server in thedevsection. If you have just one host machine, you can put for now, the same IP for both sections, but it’s a good practice to have two hosts, one for production and one for development.
STEP 2: Config group_vars/all.yml
In this file just change “put-the-host-server-user” with the user of your host server, like the step above.
STEP 3: Config host_vars/dev.yml & host_vars/prod.yml
In this two files all we have to do is to specify the host_name for our both environments. For example, for the dev.yml we put “dev.example.com” and for the prod.yml we put “example.com”.
If you don’t have a host_name, you can just put the IP of your host server in both files.
Install some dependencies to our host machine
NOTE: we are using “Amazon Linux 2 AMI” as a host, the commands that we are going to type may be specific only to this machine, so please check the equivalent of these following commands in the OS of your host server.
We are going to add these 3 dependencies:
- Python 3
- docker
- docker-compose
With these dependencies, we will be able to execute the script of tasks/main.yml, which it’s role is to run a docker container on our host machine
Python is a popular programming language often used to write scripts for operating systems. It’s versatile enough for use in web development and app design.
Install Python 3
sudo yum install python3

//With Ubuntu 18.4 , it will be sudo apt install python3
After the installation, check the version of python 3, that you have just installed by typing python3 --version
Install Docker
pip3 install dockerInstall docker-compose
pip3 install docker-composeConfigure the deploy stage
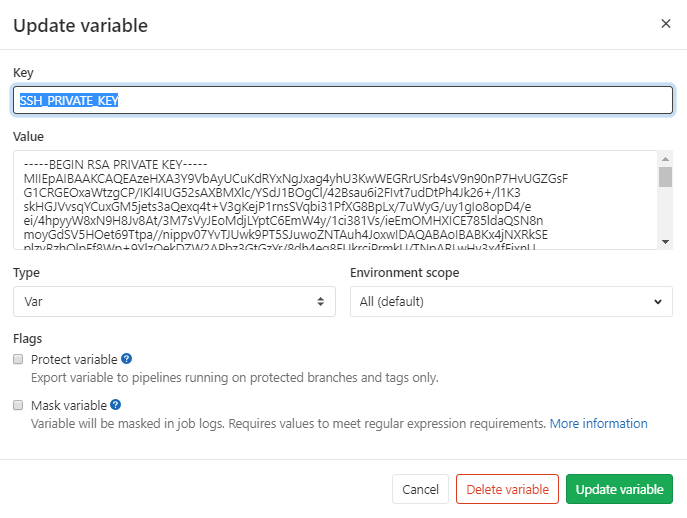
First thing here, in order for Ansible to be able to ssh to our machine, we have to provide the ssh_key for him.
For that , get back into Gitlab, go to “settings > CI/CD” and choose “Variables”, then click on add a variable.
In the key part put “SSH_PRIVATE_KEY” and for the value past the content of your .pem certificate file used to connect to your ec2. We should have something like this .
Now , Let’s go back to our gitlab-ci.yml file and add at its end these few lines .
ansible-deploy:
  stage: deploy
  image: mullnerz/ansible-playbook:2.9.1
  only :
    - master
  before_script:
  #generate ssh key
    - mkdir -p ~/.ssh
    - echo -e "$SSH_PRIVATE_KEY" > ~/.ssh/id_rsa
    - chmod 600 ~/.ssh/id_rsa
    - '[[ -f /.dockerenv ]] && echo -e "Host *\n\tStrictHostKeyChecking no\n\n" > ~/.ssh/config'
    - export IMAGE_NAME="$CI_REGISTRY_IMAGE:$CI_COMMIT_REF_NAME"
    - export DEPLOY_TARGET=prod
    - cd ansible
  script:
    - chmod -v 700 $(pwd)
    - ansible-playbook --key-file ~/.ssh/id_rsa  playbook.yml
Let’s see what’s new here and explain it .
In the before_script part we have done three main things :
- Created an “ssh” folder, and have put inside it the “id_rsa” file, which has the “ssh_private_key” of our machine
- Exported the name of our docker image so Ansible can use it later
- Specified the deploy_target as “prod”, that means we are going to use our production host server
For the script part :
- Changed the permission of the Ansible directory, (pwd : stands for
“path of the working directory”) - Run the Ansible-playbook command with our ssh file as a parameter
Done !
All, we have to do now is to push our work, and see the result.
git add .
git commit -m "test"
git push origin master
Once the push is done, we should be able to see our pipeline starting.
Once the pipeline is finished, you will be able to see an angular-app on your host server

Reference:
https://mohamedwaelbenismail.medium.com/
https://blog.eleven-labs.com/fr/introduction-gitlab-ci/