
Angular is a javascript framework for building web apps and it doesn’t load itself in the browser. We need some kind of mechanism that loads the index.html (single page) of Angular with all the dependencies(CSS and js files) in the browser. There are many ways we can build the apps and ship for production. One way is to build the apps and serve it in a NodeJS Environment. Another way is to build the angular and serve that static content with NGINX web server. Or we can also use java. With Java we would have to deal with the server code as well, for example, you need to load index.html page with java.
In this case, we are using java as the webserver which loads Angular assets and accepts any API calls from the Angular app.

If you look at the above diagram all the web requests without the /api will go to Angular routing. All the paths that contain /api will be handled by the Java server.
Prerequisites
There are some prerequisites for this article. You need to have java installed on your laptop and how http works. If you want to practice and run this on your laptop you need to have these on your laptop.
Example Project
This is a simple project which demonstrates developing and running Angular application with Java. We have a simple app in which we can add users, count, and display them at the side, and retrieve them whenever you want.

As you add users we are making an API call to the Java server to store them and get the same data from the server when we retrieve them. You can see network calls in the following video.

Here is a Github link to this project. You can clone it and run it on your machine.
// clone the project
git clone https://github.com/bbachi/angular-java-example.git
// Run Angular on port 4200
cd /src/main/ui
npm install
npm start
// Run Java Code on 8080
mvn clean install
java -jar target/users-0.0.1-SNAPSHOT.jar
How To Build and Develop The Project
Usually, the way you develop and the way you build and run in production are completely different.
In the development phase, we run the java server and the Angular app on completely different ports. It’s easier and faster to develop that way. If you look at the following diagram the Angular app is running on port 4200 with the help of a webpack dev server and the java server is running on port 8080.

Project Structure
Let’s understand the project structure for this project. We need to have two completely different folders for java and angular. It’s always best practice to have completely different folders for each one. In this way, you will have a clean architecture or any other problems regarding merging any files.


If you look at the above project structure, all the Angular app resides under the src/main/ui folder and Java code resides under the src/main/java folder. All the resources are under the folder /src/main/resources such as properties, static assets, etc
Java API
We use spring boot and a lot of other tools such as Spring Devtools, Spring Actuator, etc under the spring umbrella. Nowadays almost every application has spring boot and it is an open-source Java-based framework used to create a micro Service. It is developed by the Pivotal Team and is used to build stand-alone and production-ready spring applications.
We start with Spring initializr and select all the dependencies and generate the zip file.
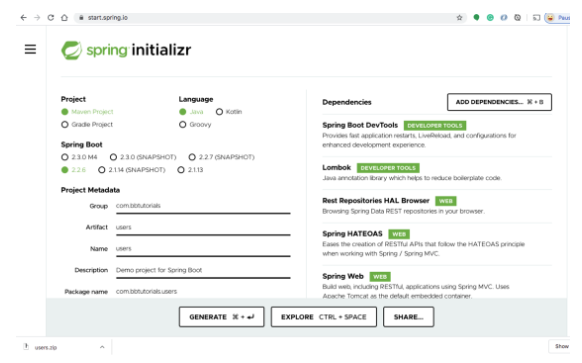
Once you import the zip file in the eclipse or any other IDE as a Maven project you can see all the dependencies in the pom.xml. Below is the dependencies section of pom.xml.
<dependencies>
<dependency>
	<groupId>org.springframework.boot</groupId>
	<artifactId>spring-boot-starter-actuator</artifactId>
</dependency>
<dependency>
	<groupId>org.springframework.boot</groupId>
	<artifactId>spring-boot-starter-data-jpa</artifactId>
</dependency>
<dependency>
	<groupId>com.h2database</groupId>
	<artifactId>h2</artifactId>
	<scope>runtime</scope>
	<version>1.4.199</version>
</dependency>
<dependency>
	<groupId>org.springframework.boot</groupId>
	<artifactId>spring-boot-starter-data-rest</artifactId>
</dependency>
<dependency>
	<groupId>org.springframework.boot</groupId>
	<artifactId>spring-boot-starter-hateoas</artifactId>
</dependency>
<dependency>
	<groupId>org.springframework.boot</groupId>
	<artifactId>spring-boot-starter-web</artifactId>
</dependency>
<dependency>
	<groupId>org.springframework.data</groupId>
	<artifactId>spring-data-rest-hal-browser</artifactId>
</dependency>
<!-- QueryDSL -->
<dependency>
	<groupId>com.querydsl</groupId>
	<artifactId>querydsl-apt</artifactId>
</dependency>
<dependency>
	<groupId>com.querydsl</groupId>
	<artifactId>querydsl-jpa</artifactId>
</dependency>

<dependency>
	<groupId>com.h2database</groupId>
	<artifactId>h2</artifactId>
	<scope>runtime</scope>
</dependency>

<dependency>
	<groupId>org.springframework.boot</groupId>
	<artifactId>spring-boot-devtools</artifactId>
	<scope>runtime</scope>
	<optional>true</optional>
</dependency>
<dependency>
	<groupId>org.projectlombok</groupId>
	<artifactId>lombok</artifactId>
	<optional>true</optional>
</dependency>
<dependency>
	<groupId>org.springframework.boot</groupId>
	<artifactId>spring-boot-starter-test</artifactId>
	<scope>test</scope>
	<exclusions>
		<exclusion>
			<groupId>org.junit.vintage</groupId>
			<artifactId>junit-vintage-engine</artifactId>
		</exclusion>
	</exclusions>
</dependency>
</dependencies>
Here are the spring boot file and the controller with two routes one with GET request and another is POST request.
//USers.Application.java

package com.bbtutorials.users;

import org.springframework.boot.SpringApplication;
import org.springframework.boot.autoconfigure.SpringBootApplication;

@SpringBootApplication
public class UsersApplication {

	public static void main(String[] args) {
	   SpringApplication.run(UsersApplication.class, args);
	}

}
//UsersController.java
package com.bbtutorials.users.controller;
import java.util.List;
import org.springframework.beans.factory.annotation.Autowired;
import org.springframework.http.ResponseEntity;
import org.springframework.web.bind.annotation.GetMapping;
import org.springframework.web.bind.annotation.PostMapping;
import org.springframework.web.bind.annotation.RequestBody;
import org.springframework.web.bind.annotation.RequestMapping;
import org.springframework.web.bind.annotation.RestController;
import com.bbtutorials.users.entity.Users;
import com.bbtutorials.users.links.UserLinks;
import com.bbtutorials.users.service.UsersService;
import lombok.extern.slf4j.Slf4j;
@Slf4j
@RestController
@RequestMapping("/api/")
public class UsersController {
@Autowired
UsersService usersService;
@GetMapping(path = UserLinks.LIST_USERS)
public ResponseEntity<?> listUsers() {
log.info("UsersController: list users");
List<Users> resource = usersService.getUsers();
return ResponseEntity.ok(resource);
}
@PostMapping(path = UserLinks.ADD_USER)
public ResponseEntity<?> saveUser(@RequestBody Users user) {
log.info("UsersController: list users");
Users resource = usersService.saveUser(user);
return ResponseEntity.ok(resource);
}
}Configure H2 Database
This H2 Database is for development only. When you build this project for production you can replace it with any database of your choice. You can run this database standalone without your application. We will see how we can configure with spring boot.
First, we need to add some properties to application.properties file under /src/main/resources
//application.properties
spring.datasource.url=jdbc:h2:mem:testdb
spring.datasource.driverClassName=org.h2.Driver
spring.datasource.username=sa
spring.datasource.password=password
spring.jpa.database-platform=org.hibernate.dialect.H2Dialect
spring.h2.console.enabled=true
Second, add the below SQL file under the same location.
//data.sql

DROP TABLE IF EXISTS users;

CREATE TABLE users (
  id INT PRIMARY KEY,
  FIRST_NAME VARCHAR(250) NOT NULL,
  LAST_NAME VARCHAR(250) NOT NULL,
  EMAIL VARCHAR(250) NOT NULL
);

INSERT INTO users (ID, FIRST_NAME, LAST_NAME, EMAIL) VALUES
  (1, 'first', 'last 1', 'abc1@gmail.com'),
  (2, 'first', 'last 2', 'abc2@gmail.com'),
  (3, 'first', 'last 3', 'abc3@gmail.com');
Third, start the application and spring boot creates this table on startup. Once the application is started you can go to this URL http://localhost:8080/api/h2-console and access the database on the web browser. Make sure you have the same JDBC URL, username and password as in the properties file.

Let’s add the repository files, service files, and entity classes as below and start the spring boot app.
//Users.java
package com.bbtutorials.users.entity;

import javax.persistence.Column;
import javax.persistence.Entity;
import javax.persistence.Id;
import javax.validation.constraints.NotNull;


import lombok.Data;

@Entity
@Data
public class Users {

	@Id
	@Column
    private long id;

    @Column
    @NotNull(message="{NotNull.User.firstName}")
    private String firstName;

    @Column
    @NotNull(message="{NotNull.User.lastName}")
    private String lastName;

    @Column
    @NotNull(message="{NotNull.User.email}")
    private String email;

}
//UsersRepository.java
package com.bbtutorials.users.repository;
import org.springframework.data.jpa.repository.JpaRepository;
import org.springframework.data.jpa.repository.JpaSpecificationExecutor;
import org.springframework.data.querydsl.QuerydslPredicateExecutor;
import org.springframework.data.rest.core.annotation.RepositoryRestResource;
import com.bbtutorials.users.entity.Users;
@RepositoryRestResource()
public interface UsersRepository extends JpaRepository<Users, Integer>, JpaSpecificationExecutor<Users>, QuerydslPredicateExecutor<Users> {}//UsersService.java
package com.bbtutorials.users.service;
import java.util.List;
import org.springframework.stereotype.Component;
import com.bbtutorials.users.entity.Users;
import com.bbtutorials.users.repository.UsersRepository;
@Component
public class UsersService {
private UsersRepository usersRepository;
public UsersService(UsersRepository usersRepository) {
this.usersRepository = usersRepository;
}
public List<Users> getUsers() {
return usersRepository.findAll();
}
public Users saveUser(Users users) {
return usersRepository.save(users);
}
}You can start the application in two ways: you can right-click on the UsersApplication and run it as a java application or do the following steps.
// mvn install
mvn clean install
// run the app
java -jar target/<repo>.war
Finally, you can list all the users with this endpoint : http://localhost:8080/api/users.

Angular App
Now the java code is running on port 8080. Now it’s time to look at the Angular app. The entire Angular app is under the folder src/main/ui. You can create with this command ng new ui.
Let’s see some important files here. Here is the service file which calls Java API.
//app.service.ts

import { Injectable } from '@angular/core';
import { HttpClient } from '@angular/common/http';

@Injectable({
  providedIn: 'root'
})
export class AppService {

  constructor(private http: HttpClient) { }

  rootURL = '/api';

  getUsers() {
    return this.http.get(this.rootURL + '/users');
  }

  addUser(user: any, id: number) {
	user.id = id;
	return this.http.post(this.rootURL + '/user', user);
  }

}
Here is the app component which subscribes to these calls and gets the data from the API.
//app.component.ts
import { Component, OnDestroy } from '@angular/core';
import { FormGroup, FormControl, Validators } from '@angular/forms';
import { AppService } from './app.service';
import { takeUntil } from 'rxjs/operators';
import { Subject } from 'rxjs';

@Component({
  selector: 'app-root',
  templateUrl: './app.component.html',
  styleUrls: ['./app.component.css']
})
export class AppComponent implements OnDestroy {

  constructor(private appService: AppService) {}

  title = 'angular-nodejs-example';

  userForm = new FormGroup({
    firstName: new FormControl('', Validators.nullValidator && Validators.required),
    lastName: new FormControl('', Validators.nullValidator && Validators.required),
    email: new FormControl('', Validators.nullValidator && Validators.required)
  });

  users: any[] = [];
  userCount = 0;

  destroy$: Subject<boolean> = new Subject<boolean>();

  onSubmit() {
    this.appService.addUser(this.userForm.value, this.userCount + 1).pipe(takeUntil(this.destroy$)).subscribe(data => {
      console.log('message::::', data);
      this.userCount = this.userCount + 1;
      console.log(this.userCount);
      this.userForm.reset();
    });
  }

  getAllUsers() {
    this.appService.getUsers().pipe(takeUntil(this.destroy$)).subscribe((users: any[]) => {
		this.userCount = users.length;
        this.users = users;
    });
  }

  ngOnDestroy() {
    this.destroy$.next(true);
    this.destroy$.unsubscribe();
  }

  ngOnInit() {
	this.getAllUsers();
  }
}import { Component, OnDestroy } from '@angular/core';
import { FormGroup, FormControl, Validators } from '@angular/forms';
import { AppService } from './app.service';
import { takeUntil } from 'rxjs/operators';
import { Subject } from 'rxjs';

@Component({
  selector: 'app-root',
  templateUrl: './app.component.html',
  styleUrls: ['./app.component.css']
})
export class AppComponent implements OnDestroy {

  constructor(private appService: AppService) {}

  title = 'angular-nodejs-example';

  userForm = new FormGroup({
    firstName: new FormControl('', Validators.nullValidator && Validators.required),
    lastName: new FormControl('', Validators.nullValidator && Validators.required),
    email: new FormControl('', Validators.nullValidator && Validators.required)
  });

  users: any[] = [];
  userCount = 0;

  destroy$: Subject<boolean> = new Subject<boolean>();

  onSubmit() {
    this.appService.addUser(this.userForm.value, this.userCount + 1).pipe(takeUntil(this.destroy$)).subscribe(data => {
      console.log('message::::', data);
      this.userCount = this.userCount + 1;
      console.log(this.userCount);
      this.userForm.reset();
    });
  }

  getAllUsers() {
    this.appService.getUsers().pipe(takeUntil(this.destroy$)).subscribe((users: any[]) => {
		this.userCount = users.length;
        this.users = users;
    });
  }

  ngOnDestroy() {
    this.destroy$.next(true);
    this.destroy$.unsubscribe();
  }

  ngOnInit() {
	this.getAllUsers();
  }
}
Interaction between Angular and Java API
In the development phase, the Angular app is running on port 4200 with the help of a webpack dev server and Java API running on port 8080.
There should be some interaction between these two. We can proxy all the API calls to Java API. Angular provides an inbuilt proxying method. First, we need to define the following proxy.conf.json under src/main/ui folder.
//proxy.conf.json

{
  "/api": {
    "target": "http://localhost:8080",
    "secure": false
  }
}
If you look at the file, all the paths that start with /api will be redirected to http://localhost:8080 where the Java API running. Then, you need to define in angular.json under the serve part with the proxyConfig key

Once this is configured, you can run the Angular app on port 4200 and java API on 8080 still make them work together.
// java API (Terminal 1)
mvn clean install
java -jar target/<war file name>
// Angular app (Terminal 2)
npm start
How To Build For Production
As you have seen above, we run the Angular and Java server on different ports in the development phase. But in the production, you need to pack your Angular code with Java and run it on one port. It means, we package the whole application into a war file and deploy that on the tomcat container which usually runs on the port 8080.
Project Structure
We need to have two completely different folders for java and angular. It’s always best practice to have completely different folders for each one. In this way, you will have a clean architecture or any other problems regarding merging any files.


The only thing that is different between development and production phases is that all the compilation Angular code goes to this folder /src/main/resources/static.
How to make Spring Boot run the Angular application?
We should change the “outputPath” attribute’s value to the “../src/main/resources/static” so that the generated bundles will be dropped into the Spring Boot’s resources/static folder.
// Angular.json

{
  "$schema": "./node_modules/@angular/cli/lib/config/schema.json",
  "version": 1,
  "newProjectRoot": "projects",
  "projects": {
    "application-frontend": {
      "projectType": "application",
      "schematics": {},
      "root": "",
      "sourceRoot": "src",
      "prefix": "app",
      "architect": {
        "build": {
          "builder": "@angular-devkit/build-angular:browser",
          "options": {
            "outputPath": "../src/main/resources/static",
            "index": "src/index.html",
            "main": "src/main.ts",
            "polyfills": "src/polyfills.ts",
            "tsConfig": "tsconfig.app.json",
            "aot": true,
            "assets": [
              "src/favicon.ico",
              "src/assets"
Now we need a maven plugin to compile the Angular code as part of the build process. We have a plugin called frontend-maven-plugin that can be used to compile all the Angular source code. Here is the link to know more about this plugin.
Reference:
https://medium.com/bb-tutorials-and-thoughts/