Last month marked the 13th anniversary of Angular’s red shield. AngularJS was the starting point for a new wave of JavaScript frameworks emerging to support the increasing need for rich web experiences.
The new Angular version 17 was released on November 8, 2023. This version adds major functionalities that use the latest browser features and make the framework even more powerful :
- Deferrable views which brings performance and developer experience to the next level
- Up to 90% faster runtime with a built-in control flow loops in public benchmarks
- Up to 87% faster builds for hybrid rendering and 67% for client-side rendering
- Fresh new look reflecting the future-looking features of Angular
- Brand new interactive learning journey
- …and dozens of other features and improvements!
A new Branding
Despite the rapid evolution of Angular, its branding has not been able to catch up — it has been almost identical since the early days of AngularJS.
Today, the framework we love, battle tested by millions of developers gets a new look reflecting its future-looking developer experience and performance!

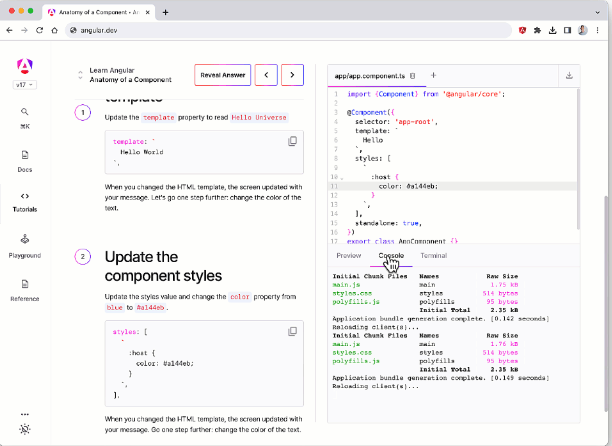
Future-looking documentation
Together with the new brand,a new home for Angular’s documentation was also developed — angular.dev. For the new documentation website we have new structure, new guides, improved content, and a build platform for an interactive learning journey that will let us learn Angular and the Angular CLI at our own pace, directly in the browser.
The new interactive learning experience is powered by WebContainers and lets us use the power of the Angular CLI in any modern web browser!
angular.dev is currently in a beta preview and will be planned to be the default website for Angular in v18
The @Component annotation
The @Component anotation has been improved. Since the beginning of Angular, it has been mandatory to pass a style array or an array of relative stylesheet paths to bind style to our components.
@Component({
  selector: 'app-root',
  templateUrl: './app.component.html',
  styleUrls: ['./app.component.css']
})
export class AppComponent {}
In general, a view is linked to a style sheet.
- a new property is introduced: styleUrl
- the styles property takes as its value a string or an array of strings
@Component({
  selector: 'app-root',
  templateUrl: './app.component.html',
  styleUrl: './app.component.css'
})
export class AppComponent {}
Standalone APIs from the start
All the ng generate commands will now scaffold standalone components, directives, and pipes.
NgModules for the foreseeable future Will be keeped, but seeing the benefits of the new standalone APIs It’s strongly recommend to move our projects to them gradually. We also have a schematic available that will automate most of this for us:
ng generate @angular/core:standaloneThe new Application builder
Angular has always had different builders to build our applications. There are two main types of Angular application:
- client-side rendering: the entire application is built client-side. In other words, the application is represented in DOM (Document Object Model) format. Navigation, data fetching and templating are managed client-side instead of server-side.
- server side rendering: the application is rendered in HTML format, each page of the application is rendered in HTML format in response to navigation, and then this page is rehydrated to make it dynamic.
Depending on the type of application, the builder was different.
Angular used the builder:
- @angular-devkit/build-angular:browser to build a client-side rendering application
- @nguniversal/builders:ssr-dev-server to build a server-side rendering application.
With the arrival of Angular 16, a new experimental builder has appeared:
@angular-devkit/build-angular:browser-esbuild. This builder made it possible to use vite for the dev-server and esbuild for the build, and offered outstanding performance:
- 87% gain on an application build
- 82% gain on a dev-server of the application
However, the builder for server rendering had not changed.
With the arrival of Angular 17, a brand-new “generic” builder has appeared. This builder allows us to build both a client-side rendering application and a server-side rendering application : @angular-devkit/build-angular:application
For existing applications using the builder: @angular-devkit/build-angular:browser-esbuild, migration to the new builder is relatively straightforward.
For server-side rendering applications, migration is a little more complex due to the number of properties to be changed.
Built-in control flow
The release of Angular 17 also sees the arrival of a new, more powerful flow code.
In previous versions, we used structural directives ngIf, ngSwitch, ngFor to manage the structure of our page.
Structural directives are very powerful, thanks to the mycrosyntax of which they are composed. Unfortunately, this mycrosyntax has its limits, and so a new flow code was created.
The built-in control flow enables:
- More ergonomic syntax that is closer to JavaScript, thus more intuitive requiring fewer documentation lookups
- Better type checking thanks to more optimal type narrowing
- It’s a concept that primarily exists at build-time, which reduces the runtime footprint (making it “disappearing”) which could drop your bundle size by up to 30 kilobytes and further improve our Core Web Vital scores
- It is automatically available in our templates without additional imports
- Significant performance improvements
Let’s look at a side by side comparison with *ngIf:
<div *ngIf="loggedIn; else anonymousUser">
  The user is logged in
</div>
<ng-template #anonymousUser>
  The user is not logged in
</ng-template>
With the built-in if statement, this condition will look like:
@if (loggedIn) {
  The user is logged in
} @else {
  The user is not logged in
}
Being able to provide the content for @else directly is a major simplification compared to the else clause of the legacy *ngIf alternative. The current control flow also makes it trivial to have @else if, which historically has been impossible.
The improved ergonomics is even more visible with *ngSwitch:
<div [ngSwitch]="accessLevel">
  <admin-dashboard *ngSwitchCase="admin"/>
  <moderator-dashboard *ngSwitchCase="moderator"/>
  <user-dashboard *ngSwitchDefault/>
</div>
which with the built-in control flow turns into:
@switch (accessLevel) {
  @case ('admin') { <admin-dashboard/> }
  @case ('moderator') { <moderator-dashboard/> }
  @default { <user-dashboard/> }
}
The new control flow enables significantly better type-narrowing in the individual branches in @switch which is not possible in *ngSwitch.
Built-in for loop
Its basic syntax is:
@for (user of users; track user.id) {
  {{ user.name }}
} @empty {
  Empty list of users
}
We often see performance problems in apps due to the lack of trackBy function in *ngFor. A few differences in @for are that track is mandatory to ensure fast diffing performance. In addition, it’s way easier to use since it’s just an expression rather than a method in the component’s class. The built-in @for loop also has a shortcut for collections with zero items via an optional @empty block.
The @for statement uses a new diffing algorithm and has more optimal implementation compared to *ngFor, which makes it up to 90% faster runtime for community framework benchmarks!
As the code shows, there’s no need to import the ngIf and ngFor directives. This new code flow is build-in to Angular and will enable simpler integration of components based on Angular signals.
Structural directives are not deprecated and there are no plans to make them deprecated.
In future, only the ngIf, ngFor and ngSwitch directives are likely to be deprecated.
PS: The built-in control flow is available in v17 under developer preview today!
One of the design goals of the built-in control flow was to enable completely automated migration. To try it in our existing projects use the following migration:
ng generate @angular/core:control-flowWarning: This new flow code is very recent, so we may encounter some formatting problems. (prettier 3.1 now supports this code flow)
IDEs:
- VsCode with Angular Language Service plugins already supports syntax highlighting
- Webstorm EAP also supports syntax highlighting. Unfortunately, template checking is not yet supported, but will be shortly.
Deferrable views
Probably one of the most important features of this release. The ability to lazyload our components easily.
Of course, we could do this before. Thanks to EsModules and the *ngComponentOutlet structural directive it was possible to lazyload our components, or we’d have to use ViewContainerRef while also managing all the complexity for cleanups, managing loading errors, showing a placeholder, etc. Taking care of various corner cases may result in some non-trivial code, which will be hard to test and debug. In short, the developer experience wasn’t there.
The new deferrable views, allow us to lazily load the list of comments and all their transitive dependencies with a single line of declarative code:
@defer {
  <comment-list />
}
Starting to lazily load a component when a certain DOM element enters the viewport involves a lot of more non-trivial logic and the IntersectionObserver API. Angular makes using IntersectionObservers as simple as adding a deferrable view trigger!
@defer (on viewport) {
  <comment-list />
} @placeholder {
  <!-- A placeholder content to show until the comments load -->
  <img src="comments-placeholder.png">
}
In the example above, Angular first renders the contents of the placeholder block. When it becomes visible in the viewport, the loading of the <comment-list/> component starts. Once the loading is completed, Angular removes the placeholder and renders the component.
There are also blocks for loading and error states:
@defer (on viewport) {
  <comment-list/>
} @loading {
  Loading…
} @error {
  Loading failed :(
} @placeholder {
  <img src="comments-placeholder.png">
}
That’s it! There’s a ton of complexity under the hood that Angular manages for us.
Deferrable views offer a few more triggers:
on idle— lazily load the block when the browser is not doing any heavy liftingon immediate— start lazily loading automatically, without blocking the browseron timer(<time>)— delay loading with a timeron viewportandon viewport(<ref>)— viewport also allows to specify a reference for an anchor element. When the anchor element is visible, Angular will lazily load the component and render iton interactionandon interaction(<ref>)— enables you to initiate lazy loading when the user interacts with a particular elementon hoverandon hover(<ref>)— triggers lazy loading when the user hovers an elementwhen <expr>— enables you to specify your own condition via an expression that returns a promise
PS: Deferrable views are available in developer preview in v17 today!
New lifecycle hooks
To improve the performance of Angular’s SSR and SSG, in the long-term we’d like to move away from DOM emulation and direct DOM manipulations. At the same time, throughout most applications’ lifecycle they need to interact with elements to instantiate third-party libraries, measure element size, etc.
To enable this, a set of new lifecycle hooks was developed:
afterRender— register a callback to be invoked each time the application finishes renderingafterNextRender— register a callback to be invoked the next time the application finishes rendering
Only the browser will invoke these hooks, which enables us to plug custom DOM logic safely directly inside our components. For example, if we’d like to instantiate a charting library we can use afterNextRender:
@Component({
selector: 'my-chart-cmp',
template: `<div #chart>{{ ... }}</div>`,
})
export class MyChartCmp {
@ViewChild('chart') chartRef: ElementRef;
chart: MyChart|null;
constructor() {
afterNextRender(() => {
this.chart = new MyChart(this.chartRef.nativeElement);
}, {phase: AfterRenderPhase.Write});
}
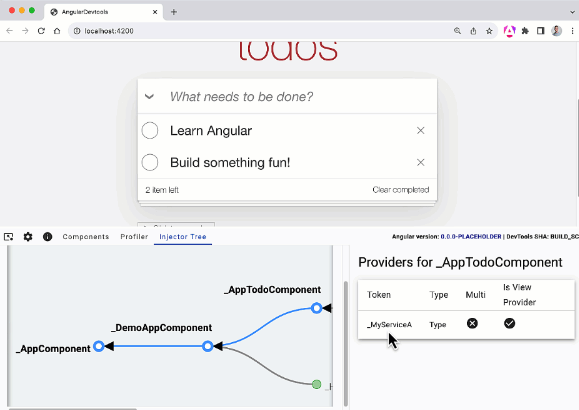
}Angular Devtools
Over the past few months, angular team have implemented brand new debugging APIs that allow us to plug into the framework’s runtime and inspect the injector tree.
It’s now possible to view the injection tree. Very useful for debugging our application when we have circular dependencies, or when a token isn’t resolved correctly.
- Dependencies of our components in the component inspector
- Injector tree and dependency resolution path
- Providers declared within the individual injectors